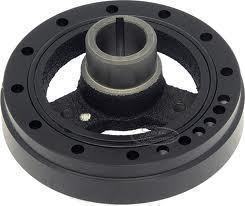
Harmonic Balancer
A harmonic balancer is a device that is connected to an engine’s crankshaft in order to reduce any vibration’s negative impact on the crankshaft and to dissipate the energy that shaft rotation creates. Since the device is the engine compartment’s first element that is connected to the shaft, it absorbs the majority of the energy generated during engine use. By absorbing this energy, only the harmonic balancer (instead of more vital engine components) fails, thereby preventing catastrophic engine failure.
How does the Harmonic Balancer Work?
The harmonic balancer is made up of two parts: 1 – The section that connects to the crankshaft and 2 – The energy dissipating component. A rubber insulator is installed in between the two pieces with the mass being constructed to directly absorb the vibrations that the rotation of the crankshaft creates. These vibrations are generated each time the associated engine cylinders fire, which imparts torque to the shaft. If the stress that the crankshaft creates exceeds what the balancer is designed to withstand, it will fail prior to the shaft or other major component fails. If there is no harmonic balancer installed, up to a 2 degree twist in the shaft may result. This may have a negative impact on ignition and cam timing, valve opening, and overall engine performance. As a result, most automotive manufacturers recommend that the harmonic balancer is inspected regularly in order to determine whether it should be replaced. This helps to prevent additional damage to the engine.
How to Change a Harmonic Balancer
The steps vary a bit depending on the engine’s make and manufacturer, but the common steps are as follows:
Step 1 – Remove the drive belts from the harmonic balancer if there are any attached. A drive pulley is typically attached to the device, which is turned in conjunction with the crankshaft rotation. The pulley is then used to move engine accessories such as the power steering pump and engine alternator. Loosen the bolts that hold the engine accessories to the engine with the appropriate wrench. Push the applicable accessory in towards the engine to slacken the belt for removal.
Step 2 – Remove the affixing bolts and pull the pulley off of the balancer in order to disconnect the harmonic balancer’s pulley that is attached to the balancer component’s face.
Step 3 – Loosen and remove the harmonic balancer’s single retaining bolt and washer from the center of the device. Use a deep set socket to reach and remove the bolt.
Step 4 – Attach a harmonic balancer puller to the component, then turn the tool’s threaded rod in a clockwise direction in order to pull the harmonic balancer away from the crankshaft.
Step 5 – Set the new harmonic balancer on the tip or end of the crankshaft and install the retaining bolt and washer. Use a deep-set socket wrench to properly fasten the balancer to the engine crankshaft.
Step 6 – Set and position the pulley against the new balancer, then install the pulley retaining bolts in reverse order of removal.
Step 7 – In reverse order of removal, set the accessory drive belts over the appropriate grooves in the pulley, then pull each engine accessory away from the components to tighten the belts.
Step 8 – Tighten all engine accessory bolts in order to complete replacing the harmonic balancer.


Comments - One Response to “Harmonic Balancer”
Sorry but comments are closed at this time.