How to Use PuTTY
PuTTY is an open source terminal emulation program that accesses Telnet, SSH, and other TCP protocols and acts as a serial client for computers. The letters “TTY” in the name PuTTY represent the terminal application in the Unix and Linux Operating Systems (OSs) and is also short for teletype. The PuTTY application was first written to be used on computers running the Windows Operating System (OS) and can access centrally based web servers that are running the Linux or Unix OS.
PuTTY Features
Features included in the current PuTTY application are:
- It uses SCP and SFTP from the command line (psftp and pscp).
- It changes the SSH encryption key and protocol.
- It stores hosts and other user preferences for later use.
- It controls port forwarding with SSH, including X11 port forwarding.
- Ipv6 support is built into it.
- It emulates VT102 control sequences and xterm.

- It has public-key authentication
- It has local serial port connection support.
- No installation required since the application is a self-contained, executable program.
How to Use PuTTY
Step 1 – Download the most recent PuTTY.exe and psftp.exe files from the PuTTY project homepage.
Step 2 – Double click the PuTTY executable icon.
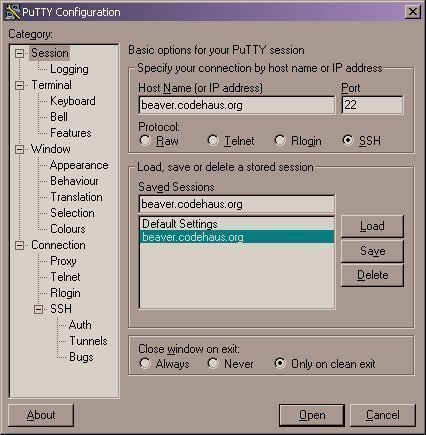
Step 3 – Choose “Session” on the “Category” panel on the left hand side of the program window.
Step 4 – Enter the IP address or the “Host Name” to be connected.
Step 5 – Enter 31415 in the “Port” field that has “22” entered into it by default. Choose “SSH” under the “Protocol” menu label, then click “Open.”
Step 6 – Enter the username and password for the server or computer that a remote connection is being established with.
Step 7 – After the prompt appears, the user will be connected to the remote server or computer and can now execute terminal commands to add or retrieve files, run networking commands, and copy files to or from the server.


Comments - One Response to “How to Use PuTTY”
Sorry but comments are closed at this time.