How to Remove a Hard Drive
The hard drive is where everything is stored on a computer. Any text document, picture or music file that you have placed on your computer is stored on the hard drive. Sometimes, though, the hard drive fails and you need to remove it. Or, you decide that you want to upgrade the hard drive so that you have more space to put things on. Regardless of your reasoning, removing the hard drive is a must before you can upgrade.
The first step is to back the hard drive up. If the HD has failed, you won’t need to do this. But, if you are removing it to upgrade or because you want to place it in a different computer, make sure that you back it up. That means plug an external hard drive into the computer and transfer all of the very important stuff onto that. Or, you can transfer your entire HD onto the external.
Open the case. Do this with no rings, watches or any metal on your wrist. Then touch the metal of the case. What you are doing here is getting the electrostatic in your body to transfer to the metal so that it travels to the ground. After doing this, unplug the computer from the wall. You can also wear an anti-static wrist strap if you opt to.
Disconnect the hard drive. To do this, locate the IDE cable and the power cable. The IDE cable is about 2 1/2 inches wide and is one of the biggest in the computer. Many hard drives come in metal cases, so look for that if you’re having a hard time finding the HD. If all else fails, consult your manual. To disconnect it, you want to carefully remove the IDE cable from the HD. To do it, grab the IDE cable connector with the thumb and forefinger and pull. When it is released, carefully let it go. Then, disconnect the power cable. Be careful not to bend any of the pins because connecting a new HD will be impossible with bent pins.
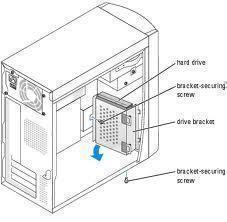
Unscrew any screws that are holding the HD in place. If the HD is in a metal case, unscrew the screws that are holding the case to the HD and then pull the hard drive out. Immediately put it into an anti-static bag so that it doesn’t get fried accidentally. Once you’ve done this, you can put the new hard drive in. Be sure to keep an eye on all of the screws so you don’t have parts moving around inside the computer.


Comments - One Response to “How to Remove a Hard Drive”
Sorry but comments are closed at this time.